


Podcasting has really taken off over the last couple of years. The format is great and easy to consume and there’s so much to listen to. It’s also great that just about anyone can create one and have a voice. Unfortunately some podcasts can be a little lacking in the quality department. Fear not, hubby’s 5 tips will get you podcasting like a pro.
My hubby’s a bit of an audio big deal. He was audio engineer for an Aria-nominated band, is a gun voice actor, straight shooting movie reviewer, he produced and presented breakfast radio and has interviewed the likes of Brett the Hitman Hart, Paul Walker, Jack Black and Simon Pegg.
He’s also built a podcasting studio. While he had a pretty nice budget, he’s also got advice on how you can take the same principles and do it on the cheap in your own home. And because happy wife happy life, I’ve made him share it here. So here’s how to get your podcast on point on any budget.
1. Location, location, location
If you’re able to choose a space for your podcasting studio, go for a room with no (or minimal) external walls in a quiet area.
For my studio, I secured a room on the basement level of the building that was tucked away from workstations, kitchens and lifts.
Having restricted access to the area also means it’s not used as a thoroughfare. Therefore no water cooler discussion on Married At First Sight leaking into the background of my recordings.
Not everyone has the luxury of selecting a space—especially for a home studio set up. Use the quietest space you have available and acoustically treat the room. If you live in a busy area, on a main road or under a flight path, you may need to be flexible with the time of day (or night) you record.
2. Treat your room right
Once you’ve selected your space, think about room treatment. Keeping outside noise out and cutting down inside noise like reflections and ambience.
The location of my studio meant I didn’t need to soundproof in the true sense, but I did need to treat the room to stop reflection, room ambience and generally sounding like people were talking in the toilet.
I used thick, heavy curtain over the room windows. A sassy black velvet at that. And as the building I’m in is rented, I couldn’t go with a permanent acoustic foam treatment over all surfaces. There’s also some pretty strict property guidelines in relation to flammable materials and fire hazards. So I went with strategically placed (and easy to remove) acoustic foam panels. They’re mainly adjacent to where the hosts and guests sit to minimise voice reflections bouncing off the walls.
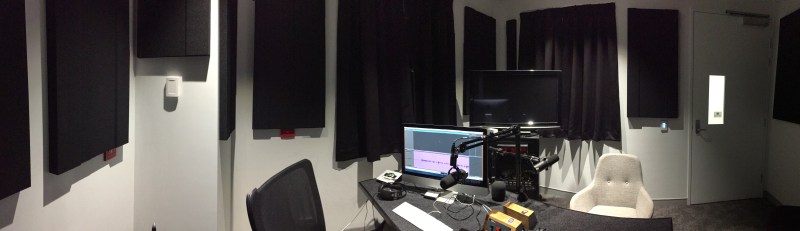
I also covered the desk in carpet. It was a fancy shiny desk that looked great but was horrendous for noise reflections both from voices and the computer. Pretty ugly and not so good for writing on now though…
For a home set up, consider acoustic foam room kits. A cheaper (and easier to remove) option is acoustic blankets. They can even be hung on tracks on the ceiling so you could essentially just roll them around the desk when recording. An easier and super-low cost option is a DIY reflection filter that sits on the desk around the mics. Wifey has a nice DIY option for you here.
The audio engineer in me cringes as I say this, but unlike voice over recording, podcasting audio won’t ever be as clean and nor does it need to be. It’s essentially a couple of people having a chat, not a polished recording for a television advertisement. You’ll naturally get nuances with multiple human voices. Plus background music coupled with an MP3 output format makes it all a bit more forgiving.
3. All the shiny objects
Your equipment needs to work for your space and your budget.
I went with dynamic mics for my studio. They’re less sensitive than condensers when it comes to room noise. They also don’t tend to air your plosives, pops and clicks dirty laundry. Helpful for guests who aren’t trained in mic technique. It also makes it easier to edit just one of the voices if you’ve used 2 mics.
I use the Shure SM7b—a favourite in radio stations and when you think about it, podcasting is basically a radio show on a smaller scale. I’ve got them on swivel boom arms to minimise the chance of bumps and knocks and to get them up close to presenters and guests. Pop filters are also a must. And regularly replaced pop filters at that. Let’s not even think about what ends up on those spongy little socks. Gross.
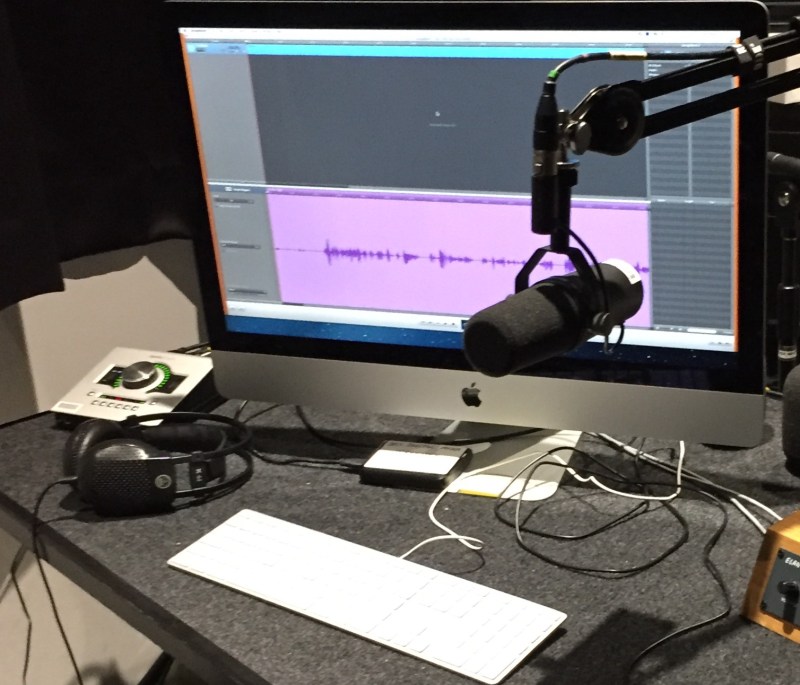
I’ve got the Universal Audio Apollo Twin and I’m in love (sorry wife). There’s not much more to say about it really.
I’ve got what I’m gonna say are ‘vintage’ AKG K44 headphones—I can’t even remember where I got them and I don’t know if they’re available anymore. But they do the job plus I find that most guests don’t like using them anyway so I’m not going to invest in anything more pricey. It is important however, to choose cans that don’t leak sound back into the mic.
I’ve also set up Skype recorder so I can interview guests over the phone.
I’ve gone pretty high end for mics and audio interface and am really happy with the quality. But you can definitely get a good enough sound with lower-end equipment.
Again, I might be a bit controversial here but I don’t see any issues with using an SM58 into a mixer or cheaper preamp like the Scarlett. If you’re a solo podcaster, you could even go the Audio-Technica AT2005USB which can plug straight into your computer. And whack it in a stand of some sort. You don’t want to be holding or dropping the mic.
My biggest piece of advice on this? Have a listen back to your audio through your headphones. That’s how your audience will be listening. If it sounds pleasant go for it! If it sounds annoying, get another mic.
4. Is this thing on?
As an ex-breakfast radio broadcaster, I know how important it is to make your guests feel calm and comfortable to get the best out of the interview.
Meeting with the guests beforehand gives me the chance to get to know them and run through some basics. I also recommend they bring notes or prompts if they like.
On the day, I always grab some levels and teach a bit of mic technique (I can’t help myself). Room temperature water and apple juice is available to help with old dry mouth.
If it’s going to be a long chat or they seem particularly nervous, I consider breaking it up and recording in logical segments. But if there’s good banter and momentum, sometimes it’s better to just keep it going.
If there’s a stuff up, I’ll take the discussion back to a logical point—usually the last question—to make editing easier. And always happy to take a break if nerves start to kick in or my guest is getting fatigued.
It might sound like a no brainer, but a ‘no mobiles in the studio’ rule is a good idea. A phone going off not only ruins the audio, it makes it hard to get back on track after the distraction.
An on-air light also works wonders and gives me a nice little flashback to radio days.
5. Clear the cutting room floor
Less is more when you’re talking podcast post production.
I record and edit in GarageBand which is totally up to the task for what I need. I don’t like over complicating things if I don’t have to. That said, if I ever need to up the production elements I can drop the audio track into something a bit more hearty like Pro Tools or Logic Pro.
I try to let my podcasts run pretty dry. I keep the conversation the focus. The only editing is usually uncomfortable silences or stuff ups. It’s nothing like editing voice overs—ums and ahs and breaths all stay in.
I’ll use minor compression if some there’s inconsistencies especially with levels between the voices, but it can get tricky as you need to have consistency with both voices.
From a branding perspective, I’ll whack in an intro and outro and hook listeners back to websites or social media accounts. I’ll also add some background music. Then bang, export as MP3 and whack it on all the applicable channels.
So for a home set up (or any set up), basically I’m saying the free stuff is plenty good enough re: editing. GarageBand or Audacity are fine.
GarageBand also includes a range of background tracks, stings and sound effects. But I’d recommend searching for some free or cheap options elsewhere or you run the risk of sounding like everyone else—there’s a lot of podcasts and YouTube videos out there using default stuff. You can spot them a mile away.
Don’t get carried away with editing or over production and don’t fall for those tempting presets (I think there’s even one called podcast in GarageBand) or de-breathing or de-essing tools or the like. They can do weird things and make your audio end up sounding unnatural.
And that’s it—easy! Wishing you all the best for your podcast and leave your thoughts in the comments section below. Cheers, Joe.
Here’s a nice little summary for some last minute cramming:

And if you like what hubby has to say above, you might also like his straight shooting movie reviews over at thewatchman.com.au
